Getting Started with NextJS : A Complete Beginner’s Guide

what is nextJS ?
NextJS is a powerfull React framework that simplifies the process of building web applications. It provides a set of conventions and tools that streamline development that making it easier to create robust and performant React applications. In this guide we will walk through the basics of NextJS. how to set up a new project, and explore the advantages it brings to React development.
this guide is all about nextJS pages directory
Table of Contents
Starting with setup new project
To start with new project install NodeJS
let’s start with create-next-app
Open a terminal and run the following commands:
npx create-next-app next-app
cd my-next-app
Replace “next-app” with your preferred project name. This will create a new NextJS project with the default configuration.
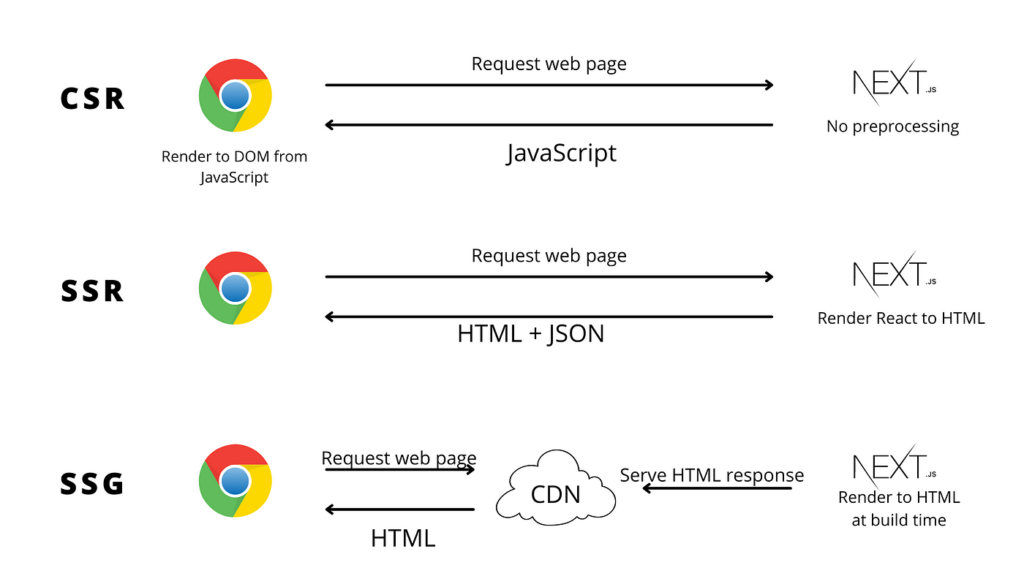
Server-side rendering (SSR) in nextJS
Server-Side Rendering (SSR) is a crucial feature that offers several benefits such as improved performance, better search engine optimization (SEO) and enhanced user experience. In this section, we will explore into why SSR is advantageous in and provide practical examples of implementing SSR in your applications.
Why SSR in NextJS ?
- Faster Initial Page Loads : With SSR the server renders the initial HTML content for each page and sending a fully formed page to the client. This results in faster loading times on the first visit as users receive a pre-rendered page rather than waiting for the client to render it.
- Improved SEO : Search engines can easily crawl and index pages that are pre-rendered on the server. SSR enhances SEO by providing search engines with content-rich pages during the crawling process and leading to better search rankings.
- Enhanced User Experience : Users experience quicker page transitions since the server delivers pre-rendered content. This leads to a more seamless navigation experience and particularly on slower network connections or less powerfull devices.
How to Implement SSR in NextJS ?
Implementing SSR is straightforward thanks to its built-in support for server-side rendering. Here’s a step-by-step guide
Start by creating a new file in the pages directory. For example create a file named serverRenderedPage.js.
// pages/serverRenderedPage.js
import React from 'react';

const ServerRenderedPage = ({ serverRenderedData }) => (
  <div>
    <h1>Server-Side Rendered Page</h1>
    <p>{serverRenderedData}</p>
  </div>
);

export async function getServerSideProps() {
  // Fetch data from an API or perform server-side computations
  const serverRenderedData = 'This data is fetched during server-side rendering';

  // Return the data as props
  return {
    props: { serverRenderedData },
  };
}

export default ServerRenderedPage;
Open your browser’s developer tools and navigate to the Network tab. You will notice that the HTML content is sent from the server demonstrating that the page is indeed server-side rendered.
Static Site Generation (SSG) in NextJS
Static Site Generation (SSG) is a powerfull feature that brings significant advantages in terms of performance, scalability and simplicity. This guide will explore into the concept of SSG. explain how it works and explore use cases where static site generation proves to be highly beneficial.
SSG involves pre-rendering the pages of a website at build time that resulting in static HTML, CSS and JavaScript files. These static files are then served to users that eliminating the need for server-side processing during runtime. Its allows developers to leverage SSG for generating highly optimized and efficient websites.
How SSG Works in NextJS ?
- Build Time Rendering : During the build process, NextJS pre-generates HTML files for each page based on the content available at build time. This content can come from various sources such as API calls, files or databases.
- Deployment of Static Assets : The generated static files are then deployed to a hosting provider or content delivery network (CDN). Since these files are static they can be efficiently cached and served globally and reducing latency for users.
- Client-Side Navigation : Once the static assets are loaded than client-side navigation takes over. Subsequent navigation and interactions are handled on the client-side that resulting in a smooth user experience.
Use Cases for Static Site Generation (SSG)
- Content-Based Websites : Blogs, documentation sites and marketing pages benefit greatly from SSG. The content once created that doesn’t change frequently and making it suitable for pre-rendering at build time.
- E-commerce Product Listings : Product catalog pages in e-commerce websites often have static content that can be pre-rendered. This allows for faster page loads and improved SEO while ensuring the dynamic aspects are handled on the client side.
- Landing Pages : Static landing pages with fixed content and minimal interactivity are excellent candidates for SSG. These pages can be rapidly delivered to users without the need for server-side processing.
- Improved Performance : SSG significantly improves website performance by reducing server load and minimizing the time it takes to load pages. This is mainly beneficial for websites with a global audience.
How to Implement SSG in NextJS ?
To implement SSG in NextJS. Use the getStaticProps function within your page components. This function fetches data at build time and allowing you to pre-render pages with dynamic content.
// pages/examplePage.js
import React from 'react';

const ExamplePage = ({ data }) => (
  <div>
    <h1>{data.title}</h1>
    <p>{data.description}</p>
  </div>
);

export async function getStaticProps() {
  // Fetch data from an API or other sources
  const data = await fetchData();

  // Return the data as props
  return {
    props: { data },
  };
}

export default ExamplePage;
dynamic routes and data fetching in nextJS
NextJS enables developers to create dynamic and data-driven pages by seamlessly integrating dynamic routes and efficient data fetching. In this section we will explore the process of creating dynamic routes and fetching data for those routes within application.
Creating Dynamic Routes
- File Naming Convention : Utilize the
[]brackets to indicate dynamic segments within your pages directory. For instance naming a file[slug].jsallows you to create dynamic routes like/post/1,/post/2etc. - Dynamic Route Component : Inside the dynamic route file you can access the dynamic segment through the component’s props. For Example
// pages/[slug].js
import React from 'react';

const DynamicRoutePage = ({ slug }) => (
  <div>
    <h1>{slug}</h1>
    {/* Additional content */}
  </div>
);

export default DynamicRoutePage;
Fetching Data for dynamic routes
NextJS offers the getStaticPaths and getStaticProps functions for static site generation and getServerSideProps for dynamic data for dynamic routes.
GetStaticPaths and getStaticProps for SSG in nextJS
getStaticPaths Function Fetch possible values for dynamic routes using an API or database. Return an array of objects with a params key. each object key and value pair representing a route.
export async function getStaticPaths() {
  const paths = await fetchPathsFromAPI(); // Replace with your data-fetching logic
  return {
    paths,
    fallback: false, // Set to true for incremental static regeneration
  };
}
getStaticProps Function Fetch data for a specific dynamic route based on the parameters provided. The data is passed as props to the page component.
export async function getStaticProps({ params }) {
  const data = await fetchDataForSlug(params.slug); // Replace with your data-fetching logic
  return {
    props: { data },
  };
}
getStaticPaths is only works with getStaticProps
getServerSideProps for SSR in nextJS
Fetch data for a specific dynamic route on each request providing real-time data. The data is passed as props to the page component.
export async function getServerSideProps({ params }) {
  const data = await fetchDataForSlug(params.slug); // Replace with your data-fetching logic
  return {
    props: { data },
  };
}
placeholder functions (fetchDataForSlug) is replaced with your actual data-fetching logic.
With NextJS you can make pages that adjust to different content needs. Whether you are into static site generation (SSG) or server-side rendering (SSR). NextJS gives you the freedom to build dynamic and efficient apps using these flexible route and data-fetching features
optimizing images in nextJS
Making sure your images are just right is key to making your pages load fast and work smoothly. It has handy tools built in to help you easily make your images look great without slowing things down. Let’s check out some simple tricks to make your images load faster in your apps.
Use the NextJS Image Component
Take advantage of Image component. It has smart features to make your images load and show up super smoothly. This component takes care of things like lazy loading and creating different sizes of your images automatically.
import Image from 'next/image';

const OptimizedImage = () => (
  <Image
    src="/path/to/image.jpg"
    alt="Description"
    width={width}
    height={height}
  />
);
with the Image component images are lazy-loaded. They are loaded only when they enter the screen viewport. Additionally its automatically generates multiple image sizes to serve the most appropriate one based on the user device and screen size.
Responsive Image Loading
Specify the responsive layout using the layout property in the Image component. This makes images adapt seamlessly to different screen sizes.
<Image
  src="/path/to/image.jpg"
  alt="Description"
  layout="responsive"
  width={width}
  height={height}
/>
Automatic Format Selection
Take advantage of automatic format selection. If you provide images in different formats (e.g., WebP). NextJS will intelligently choose the most suitable format based on the user’s browser and optimizing both quality and file size.
Authentication in NextJS Applications
Keeping your website safe is really important and authentication is the key to making sure only the right people can access important stuff. Its makes it easy to set up different ways for users to log in like using codes (JWT) or connecting with other apps (OAuth) or logging in with other accounts. Let’s explore into how these log-in methods works.
JSON Web Tokens (JWT) in nextJS
JWT is a compact URL-safe means of representing claims between two parties. In applications you can use JWTs for authentication by:
- Server-side Verification : Validate JWTs on the server to ensure the integrity and authenticity of user information.
- Secure Storage : Store JWTs securely on the client side commonly in HTTP-only cookies to prevent access by malicious scripts.
OAuth in NextJS
OAuth is a way to let other services vouch for you when logging into a website. you can connect with OAuth by:
- Authorization Code Flow : Implementing the OAuth 2.0 Authorization Code Flow to securely obtain user authorization tokens.
- Token Storage : Securely storing and managing access tokens on the client side often using cookies or browser storage.
Third-Party Authentication Providers in nextJS
Third-party authentication providers such as Google, Facebook or GitHub to simplify user authentication
Use third-party libraries like NextAuth.js to streamline the integration of multiple authentication providers that simplifying the authentication process.
// Example of using NextAuth.js with Google OAuth provider
// pages/api/auth/[...nextauth].js

import NextAuth from 'next-auth';
import Providers from 'next-auth/providers';

export default NextAuth({
  providers: [
    Providers.Google({
      clientId: process.env.GOOGLE_CLIENT_ID,
      clientSecret: process.env.GOOGLE_CLIENT_SECRET,
    }),
    // Add more providers as needed
  ],
  // Add custom configurations, callbacks, and event handlers
});
Don’t forgot to replace placeholders like process.env.GOOGLE_CLIENT_ID and process.env.GOOGLE_CLIENT_SECRET with your actual credentials.
SEO Best Practices In NextJS
Optimizing your applications for search engines is important for improving visibility and attracting organic traffic. Follow these SEO best practices for your applications are well-optimized for search engine rankings
Page Titles and Meta Descriptions
Dynamic Titles : Dynamically generate unique and descriptive page titles for each page using the <Head> component. Include relevant keywords to improve search engine understanding.
// pages/examplePage.js
import Head from 'next/head';

const ExamplePage = () => (
  <div>
    <Head>
      <title>Dynamic Page Title</title>
      <meta name="description" content="Description of the page for search engines" />
    </Head>
    {/* Page content */}
  </div>
);

export default ExamplePage;
Structured Data with JSON-LD (Schema)
Rich Snippets : Implement structured data using JSON-LD format to provide search engines with additional context about your content. This can enhance your search results with rich snippets.
// pages/examplePage.js
import Head from 'next/head';

const ExamplePage = () => (
  <div>
    <Head>
      <script type="application/ld+json">
        {`
          {
            "@context": "https://schema.org",
            "@type": "Organization",
            "name": "Your Organization",
            "url": "https://www.yourwebsite.com",
            "logo": "https://www.yourwebsite.com/logo.png"
          }
        `}
      </script>
    </Head>
    {/* Page content */}
  </div>
);

export default ExamplePage;
XML Sitemap
Submit to Search Engines : Generate and submit an XML sitemap to search engines. This helps search engines discover and index all relevant pages on your site.
Robots.txt
Control Crawling : Create a robots.txt file to guide search engine crawlers on which pages to crawl or avoid.
User-agent: *
Disallow: /admin/
Implementing these SEO best practices in your applications for search engines can better understand and index your content. By providing relevant metadata, optimizing images and structuring data. you can make your site’s visibility good in search engine results that will leading to increased organic traffic.
Headless CMS Integration in nextJS
Integrating with headless Content Management System (CMS) offers a powerfull solution for efficient content management and seamless updates. Here we will discuss the benefits and steps for integrating NextJS with a headless CMS platform.
Select a Headless CMS
Choose a headless CMS platform that aligns with your project requirements. Popular options include Strapi, Contentful, Sanity and WordPress (with its headless configuration). Each CMS offers its unique features so select one based on your specific needs and preferences.
Content Modeling
Define your content structure within the headless CMS. Create content models that represent different types of data such as blog posts, pages or products. Specify the fields and relationships between them to ensure a coherent structure.
API Integration
Headless CMS platforms expose APIs that allow you to retrieve content programmatically. In your application use these APIs to fetch content dynamically. Use tools like fetch or dedicated libraries to make HTTP requests to the CMS API.
// pages/index.js
import React, { useEffect, useState } from 'react';

const HomePage = () => {
  const [content, setContent] = useState(null);

  useEffect(() => {
    const fetchContent = async () => {
      try {
        const response = await fetch('https://your-cms-api-url.com/content');
        const data = await response.json();
        setContent(data);
      } catch (error) {
        console.error('Error fetching content:', error);
      }
    };

    fetchContent();
  }, []);

  return (
    <div>
      {/* Render content dynamically */}
      {content && <h1>{content.title}</h1>}
    </div>
  );
};

export default HomePage;
Real-time Updates
Consider implementing real-time updates using webhooks or other mechanisms provided by the headless CMS. This ensures that your application stays up-to-date with the latest content changes without manual intervention.
PWA (Progressive Web App) Features in NextJS
Progressive Web Apps (PWAs) combine the best of web and mobile applications, offering good user experiences, offline capabilities and improved performance. Implementing PWA features in a NextJS application is straightforward. thanks to built-in support and additional tools. Let’s explore how to make good your application with PWA features
Service Worker Configuration
A service worker is a key component of PWAs that enabling offline functionality and background synchronization. NextJS provides built-in support for service workers.
In your next.config.js file enable the service worker
// next.config.js
const withPWA = require('next-pwa');

module.exports = withPWA({
  pwa: {
    dest: 'public',
  },
});
offline Access
With the service worker enabled your NextJS application can cache assets and pages for offline access.
// pages/_app.js
import { useEffect } from 'react';

function MyApp({ Component, pageProps }) {
  useEffect(() => {
    if ('serviceWorker' in navigator) {
      navigator.serviceWorker.register('/service-worker.js');
    }
  }, []);

  return <Component {...pageProps} />;
}

export default MyApp;
Manifest File
Create a manifest file (manifest.json) to provide metadata about your app such as its name, icons and theme color. This file is crucial for enabling the “Add to Home Screen” functionality on mobile devices.
// public/manifest.json
{
  "name": "Next.js PWA",
  "short_name": "NextPWA",
  "description": "A Progressive Web App built with Next.js",
  "start_url": "/",
  "display": "standalone",
  "background_color": "#ffffff",
  "theme_color": "#000000",
  "icons": [
    {
      "src": "/icon.png",
      "sizes": "192x192",
      "type": "image/png"
    }
  ]
}
App Shell Architecture
automatic code splitting and lazy loading for efficient app shell architecture. This makes a faster initial load and smoother navigation.
// pages/_app.js
import dynamic from 'next/dynamic';

const Header = dynamic(() => import('../components/Header'));
const Footer = dynamic(() => import('../components/Footer'));

function MyApp({ Component, pageProps }) {
  return (
    <div>
      <Header />
      <Component {...pageProps} />
      <Footer />
    </div>
  );
}

export default MyApp;
conclusion
In summary NextJS is a robust React framework that simplifies web development. We covered setting up a new project the benefits of Server-Side Rendering (SSR) and Static Site Generation (SSG), dynamic routes and data fetching. Optimizing images, authentication methods, SEO practices, headless CMS integration and Progressive Web App (PWA) features were also discussed.
NextJS provides a powerfull and flexible toolkit that making it an excellent choice for building dynamic, SEO-friendly and performant web applications.
What is NextJS ?
It’s React framework that simplifies web application development by providing conventions and tools. It supports features like Server-Side Rendering (SSR), Static Site Generation (SSG), and seamless integration with React components.
Why is Server-Side Rendering (SSR) important in NextJS ?
SSR in NextJS enhances performance by rendering initial HTML content on the server that leading to faster page loads, improved SEO and a smoother user experience.


4 Comments
Comments are closed.